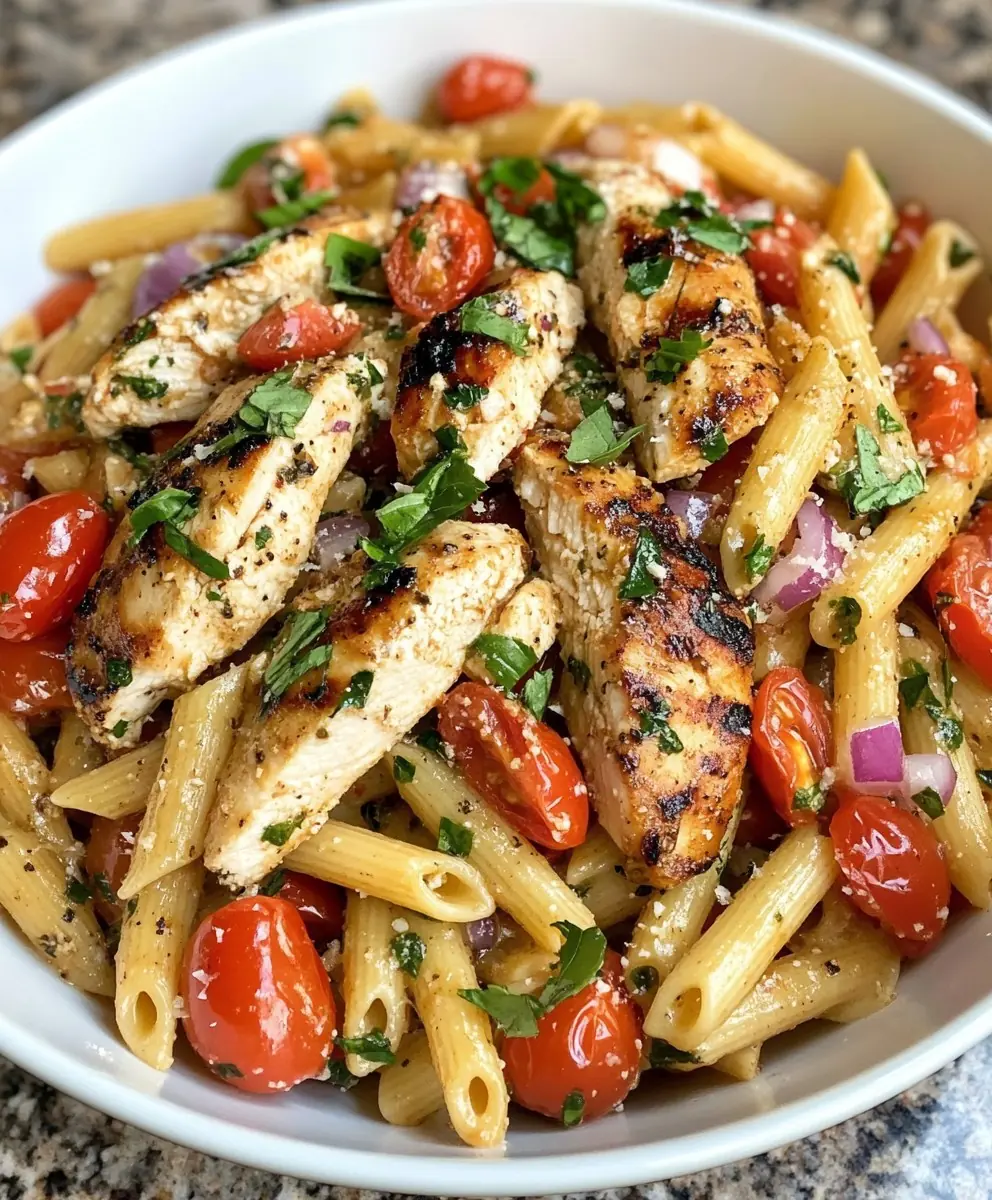
Bruschetta Chicken Pasta
Ingredients:
2 boneless, skinless chicken breasts, grilled and sliced
1 pound penne pasta
2 cups cherry tomatoes, halved
1/4 cup red onion, finely chopped
3 cloves garlic, minced
1/4 cup fresh basil, chopped
1/4 cup balsamic vinegar
1/3 cup olive oil
1/2 cup grated Parmesan cheese
Salt and pepper to taste
Directions:
Cook the penne pasta according to package instructions until al dente. Drain and set aside.
In a large bowl, combine the cherry tomatoes, red onion, garlic, and basil. Add balsamic vinegar and olive oil. Season with salt and pepper, and toss to combine.
In a large skillet over medium heat, combine the cooked pasta with the tomato mixture. Heat through, stirring gently.
Add the grilled, sliced chicken to the skillet and toss to combine.
Serve the pasta in bowls, topped with grated Parmesan cheese.
CRISPY CHICKEN STRIPS
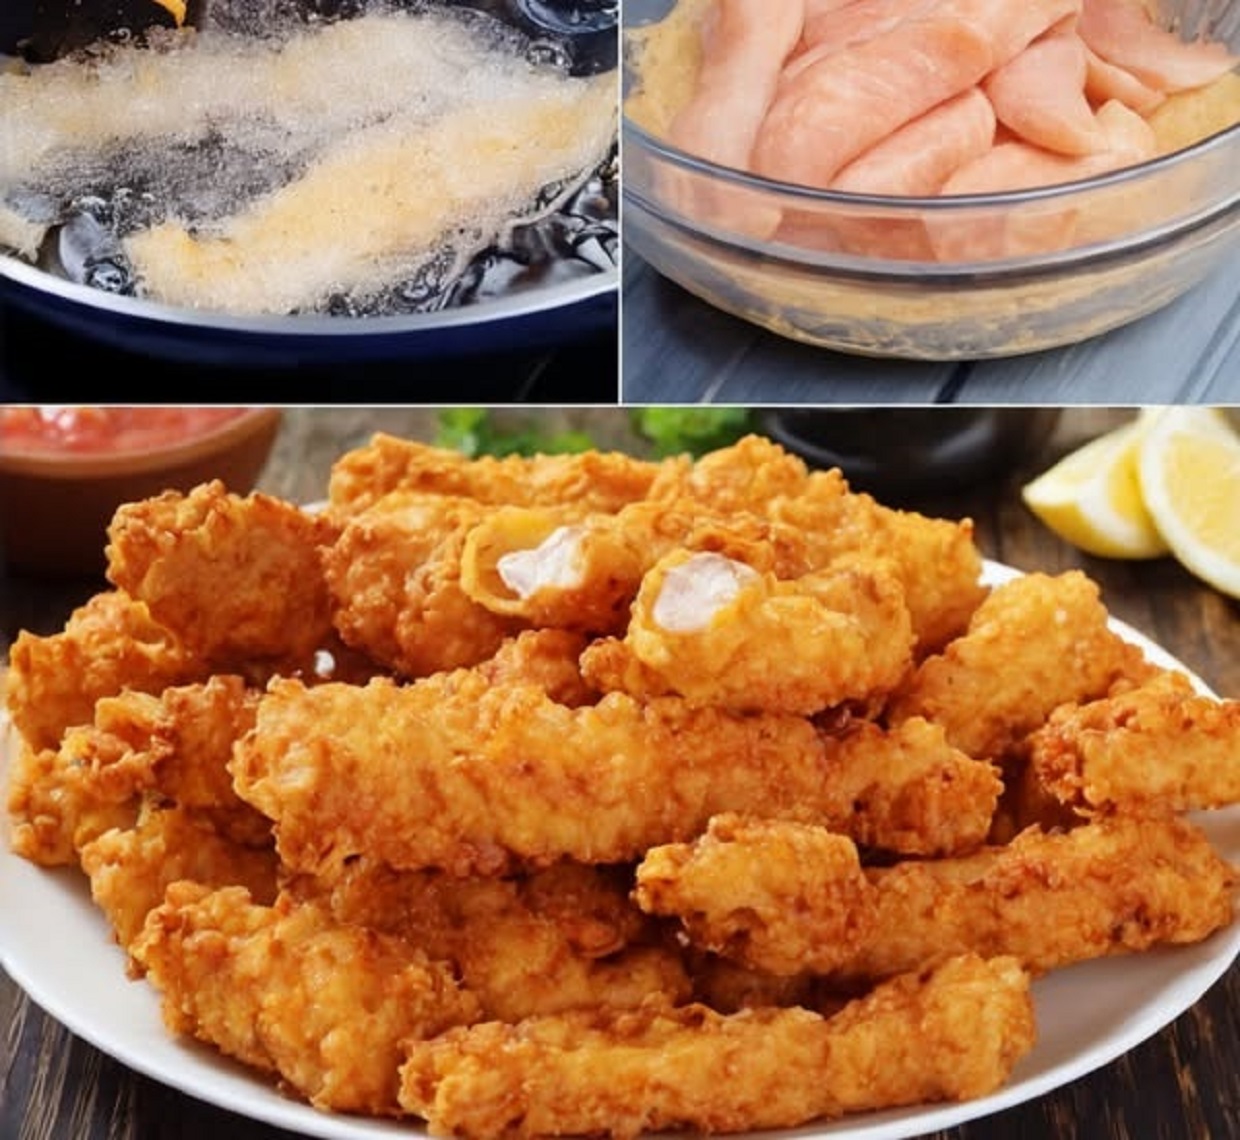
As a chef, the journey to perfecting the art of crispy chicken strips has been both a culinary challenge and a passion project. The crunch of perfectly cooked breading encasing succulent, tender chicken not only satisfies the palate but also ignites the senses. It’s about finding that ideal balance where the golden crust meets the juicy interior, creating a symphony of textures and flavors in every bite. Over the years, I’ve honed this recipe through trial and error, adapting techniques to ensure each strip is nothing short of sensational.
There’s a profound satisfaction in serving a dish that brings smiles around the dining table, and these crispy chicken strips do just that. They evoke a sense of home, a reminder of simple yet delightful meals shared with loved ones. Each batch I prepare is a reflection of my commitment to crafting dishes that not only feed the body but also warm the heart. Cooking is not just about following a recipe it’s about weaving your own story into the flavors, and with these chicken strips, each crunchy bite tells a tale of culinary love and creativity.
Crispy Chicken Strips Ingredients
The secret to crafting irresistible crispy chicken strips lies in using the right ingredients and combining them with precision. Here’s what you need:
- Chicken Breasts: Start with high quality, boneless, skinless chicken breasts for a lean, tender base.
- Seasoned Flour: All purpose flour combined with garlic powder, paprika, salt, and pepper creates a flavorful coating that adheres well to the chicken.
- Eggs and Milk: This mixture helps the breadcrumbs stick to the chicken, ensuring a crispy exterior after baking.
- Breadcrumbs: They are the final coating that gives these chicken strips their classic crunch.
Step by Step Guide for Chicken Strips
Preparation Tips
Begin by preheating your oven and lining your baking sheet with parchment paper to prevent sticking and ensure easy cleanup. Cutting the chicken into even strips is crucial for consistent cooking.
Breading Process
Set up a breading station with three components: seasoned flour, egg wash, and breadcrumbs. Dredge each strip in flour, dip in the egg wash, then coat thoroughly in breadcrumbs. This triple dip method guarantees a crispy finish.
Customizing Your Chicken Strips
Flavor Adaptations
While the basic seasonings of garlic, paprika, salt, and pepper create a delicious profile, feel free to experiment. Add chili powder for heat, or a pinch of cayenne for a spicy kick. Customizing your spice blend can cater to everyone’s palate at your dining table.
Dipping Sauces and Sides
Crispy chicken strips pair wonderfully with a variety of sauces. Offer a selection including creamy ranch, spicy buffalo, or a sweet and tangy barbecue sauce to enhance the flavors. For sides, consider light salads or crispy fries.
Cooking Techniques
Baking for Health
Baking chicken strips rather than frying them offers a healthier alternative without sacrificing texture. Ensuring your oven is properly calibrated to 400°F ensures that each strip is cooked evenly and ends up juicy on the inside with a golden crispy outside.
Frying for Extra Crisp
If you prefer the traditional fried method, heat oil in a deep fryer or a deep skillet to 375°F. Fry the strips until golden brown, ensuring not to overcrowd the pan to maintain oil temperature, which is key for that perfect crunch.
Advanced Prep and Storage Tips
Make Ahead Strategies
For a busy chef, preparing ahead is key. You can bread the chicken strips and freeze them before cooking. Lay them out on a baking sheet to freeze individually, then transfer to a freezer safe bag. This method makes it easy to cook fresh strips in minutes.
Storage Solutions
Leftover cooked chicken strips can be stored in the refrigerator for up to three days. Reheat them in the oven to restore their crispy texture, avoiding the microwave which can make them soggy.
Challenges and Troubleshooting
Avoiding Soggy Strips
One common challenge is ending up with soggy chicken strips. This can usually be avoided by ensuring the chicken is not damp when you start breading and by letting the breaded strips sit for 10 minutes before baking or frying. This helps the coating adhere better and prevents moisture from seeping out during cooking.
Ensuring Even Cooking
Unevenly cooked chicken strips can disappoint. To avoid this, make sure to cut the chicken into uniform sizes. When baking, flip the strips halfway through to ensure even crispness on all sides.
These tips and insights into making crispy chicken strips reflect years of culinary experience and experimentation. By understanding each element from preparation to customization you can elevate a simple dish into a gourmet experience that delights your guests every time. Explore more innovative recipes and cooking tips by visiting our detailed guide on other delectable dishes ( how to make a perfect vanilla cupcakes recipe ).
Enhancing Baking Efficiency
Optimizing Preparation Time
Streamlining the preparation process for chicken strips can significantly enhance your kitchen efficiency. Organizing your ingredients and tools before you start cooking can save valuable time. Measuring spices and setting up the breading station in advance helps smooth the workflow and minimizes stress during the cooking process.
Batch Cooking and Storage
For chefs managing a busy schedule, batch cooking is a lifesaver. Preparing multiple batches of chicken strips and storing them properly not only ensures you have a quick meal solution on hand but also helps maintain the quality of the food. Cool the chicken strips completely before packaging them in air tight containers to preserve freshness.
Customizing for Diverse Tastes
Adapting Recipes for Global Flavors
Chicken strips are incredibly versatile and can be adapted to suit a variety of taste preferences, making them ideal for diverse crowds. Experiment with global spices and seasonings such as turmeric for an Indian twist or sumac for Middle Eastern flair. This not only caters to different palates but also adds a unique touch to a familiar dish.
Vegetarian and Vegan Alternatives
Adapting the crispy chicken strips recipe for vegetarian or vegan diners can expand your audience. Using seasoned tofu or jackfruit as a substitute for chicken allows you to offer a plant based version of this popular dish, ensuring that everyone can enjoy your culinary creations regardless of their dietary preferences.
When Kitchen Mishaps Occur
Dealing with Overcooking
Overcooking chicken strips can lead to dry, tough meat. To avoid this, keep a vigilant eye on cooking times and use a meat thermometer to ensure the internal temperature reaches just the right point for safety without exceeding it. Offering a dip or sauce can also help to counteract dryness in overcooked strips.
Resolving Breading Challenges
Breading that doesn’t adhere or comes off during cooking can be frustrating. To prevent this, ensure each strip is properly coated and press the breadcrumbs onto the chicken to secure them. Letting breaded strips rest for 10 minutes before cooking can also help set the coating.
Seasonal Serving Suggestions
Spring and Summer
In warmer months, pair crispy chicken strips with light, refreshing sides like a zesty coleslaw or a fresh green salad. Serving them with citrus infused mayonnaise or a light yogurt based dip can also complement the season.
Fall and Winter
During the cooler seasons, offer these strips with heartier sides such as roasted vegetables or a warm potato salad. Spicy dips or gravies make a comforting addition that suits the weather.
Effective Time Management in the Kitchen
Quick Cooking Tips
Utilizing kitchen timers and preparing ingredients while the oven preheats can shave off significant preparation time. This is especially useful during peak hours or when preparing multiple dishes simultaneously.
Utilizing Kitchen Gadgets
Embrace the use of kitchen gadgets to speed up the preparation process. Food processors for slicing, and electric mixers for breading, can reduce manual prep time drastically.
Final Reflections on Cupcake Baking
Continual Learning and Adaptation
Every batch of cupcakes offers valuable lessons. Whether it’s tweaking the amount of time they spend in the oven or adjusting the spices used, each cooking session provides insights that refine your skills and improve your results.
The Joy of Sharing
Ultimately, the greatest satisfaction as a chef comes from sharing your creations. Each batch of cupcakes is an opportunity to bring joy to others, showcasing your dedication to your craft.
Frequently Asked Questions
What’s the secret to extra crispy chicken strips?
The key to achieving that coveted extra crispiness lies in the breading process. Ensure your chicken is thoroughly dry before you start coating. Dip each strip into the flour mixture, followed by an egg wash, and then generously coat with breadcrumbs. For an even crispier texture, let the breaded chicken sit for about 10 minutes before baking or frying. This allows the coating to set and helps it adhere better during the cooking process.
Can I make crispy chicken strips ahead of time?
Yes, you can prepare crispy chicken strips in advance. Bread the chicken as directed and lay them out on a baking sheet without touching each other. Freeze until solid, then transfer to a freezer bag or container. You can bake or fry them straight from frozen, just add a few extra minutes to the cooking time. This method is perfect for meal prep or making large batches for a party.
How do I ensure my chicken strips are cooked through without burning the crust?
To ensure your chicken strips are cooked through without burning the crust, bake them at a moderate oven temperature 400°F (200°C) works well. Use a meat thermometer to check that the internal temperature reaches 165°F (74°C). If the crust browns too quickly, cover the strips with aluminum foil until they are fully cooked.
What are some healthy alternatives to frying chicken strips?
Baking chicken strips is a healthier alternative to frying. Preheat your oven as directed and place the breaded strips on a wire rack over a baking sheet this allows hot air to circulate around the chicken, cooking it evenly and reducing grease. You can also use an air fryer, which requires minimal oil and produces a similarly crispy texture.
What dipping sauces pair well with crispy chicken strips?
Crispy chicken strips are versatile and can be paired with a variety of dipping sauces. Popular choices include barbecue sauce, honey mustard, spicy buffalo, and ranch dressing. For a unique twist, try a sweet and tangy mango chutney or a creamy garlic aioli. Experimenting with different sauces can completely transform the flavor profile of your meal.
Cheeseburger Soup

Why You’ll Love This Recipe
- Cheeseburger-Inspired Magic : All the flavors you love about a cheeseburger, but in soup form—perfect for slurping!
- Hearty & Filling : Loaded with protein, potatoes, and veggies, it’s a complete meal in one bowl.
- Easy One-Pot Recipe : Minimal cleanup and maximum flavor—it’s a win-win!
- Customizable : Add your favorite toppings like bacon, pickles, or jalapeños for extra flair.
- Kid-Friendly : Even picky eaters will devour this creamy, cheesy soup.
Ingredients You’ll Need
Serves 6–8
For the Soup:
- 1 lb ground beef
- 1 medium onion , diced
- 2 carrots , diced
- 2 celery stalks , diced
- 3 cups diced potatoes (about 3 medium potatoes, peeled if desired)
- 4 cups chicken broth
- 1 cup heavy cream (or half-and-half for a lighter option)
- 1 tsp garlic powder
- 1 tsp onion powder
- Salt and pepper , to taste
For the Cheese Sauce:
- 2 cups shredded cheddar cheese
- 1/2 cup milk (optional, to thin the cheese sauce if needed)
For Toppings:
- Diced pickles
- Shredded lettuce
- Chopped tomatoes
- Crumbled cooked bacon
- Green onions , sliced
Step-by-Step Instructions
Step 1: Cook the Beef and Veggies
- In a large pot or Dutch oven, brown the ground beef over medium heat until fully cooked. Drain any excess grease.
- Add the diced onion, carrots, and celery to the pot. Cook for 5–7 minutes , stirring occasionally, until the veggies soften.
Step 2: Simmer the Soup
- Stir in the diced potatoes, chicken broth, garlic powder, onion powder, salt, and pepper. Bring the mixture to a boil, then reduce the heat to medium-low and simmer for 15–20 minutes , or until the potatoes are tender.
Step 3: Make the Cheese Sauce
- In a small saucepan, melt the shredded cheddar cheese over low heat, stirring constantly to prevent clumping. If the cheese sauce is too thick, stir in a splash of milk to thin it out.
Step 4: Combine and Creamify
- Once the potatoes are tender, stir the heavy cream into the soup for a rich, creamy texture.
- Gradually stir in the melted cheese sauce, mixing well to combine. Taste and adjust seasoning as needed.
Step 5: Serve
- Ladle the soup into bowls and top with your favorite cheeseburger-inspired toppings: diced pickles, shredded lettuce, chopped tomatoes, crumbled bacon, and green onions.
- Serve hot with crusty bread or burger buns on the side for dipping!
Why This Recipe Works
- Ground Beef Base : The savory beef adds depth and richness, just like a classic cheeseburger.
- Creamy Texture : The combination of heavy cream and melted cheese creates a velvety, indulgent soup.
- Topping Perfection : Adding fresh toppings at the end mimics the crunch and freshness of a real cheeseburger.
Variations to Try
- Spice It Up : Add diced jalapeños or a dash of hot sauce for a spicy kick.
- Gluten-Free Option : Use gluten-free broth and ensure your toppings (like bacon) are GF-friendly.
- Veggie Twist : Swap the ground beef for plant-based crumbles or lentils for a vegetarian version.
- Loaded Version : Stir in cooked bacon bits or sautéed mushrooms for extra flavor.
- Cauliflower Swap : Replace the potatoes with cauliflower for a low-carb alternative.
Tips for Success
- Grate Your Own Cheese : Pre-shredded cheese often contains anti-caking agents that can make the sauce grainy. Freshly grated cheese melts smoother.
- Don’t Boil the Cheese : Stir the cheese sauce over low heat to avoid separation or clumping.
- Storage : Store leftovers in an airtight container in the fridge for up to 3 days. Reheat gently on the stovetop, adding a splash of broth or milk to loosen the consistency.
Serving Suggestions
- Romantic Touch : Garnish with a sprinkle of smoked paprika or fresh parsley for elegance.
- Brunch Staple : Serve alongside breakfast sandwiches or omelets for a brunch twist.
- Party Platter : Pair with sliders, fries, or a salad bar for a fun “build-your-own” theme.
Final Thoughts
This Cheeseburger Soup is a celebration of comfort food flavors, offering a dish that feels indulgent yet wholesome. With its creamy texture, savory beef base, and customizable toppings, it’s a recipe that’s sure to impress whether you’re cooking for a special occasion, a casual meal, or simply craving something warm and satisfying.
Your turn! Have you ever made a soup inspired by a classic dish before? Share your favorite variations or serving ideas below. 


 Cinnamon Roll Bliss Bars