Garlic Chicken with Broccoli and Spinach 


Ingredients:
-
4 chicken breasts, cut into strips
-
3 garlic cloves, minced
-
2 cups of broccoli florets
-
2 cups of fresh spinach
-
2 tablespoons of olive oil
-
1 teaspoon of paprika
-
Juice of 1/2 lemon
-
Salt and pepper to taste
-
1/4 cup of chicken broth
Instructions:
-
Season the Chicken:
-
In a bowl, season the chicken strips with salt, pepper, paprika, and lemon juice.
-
Mix well and let it marinate for about 10-15 minutes.
-
-
Sauté the Chicken:
-
Heat 1 tablespoon of olive oil in a large pan over medium-high heat.
-
Add the chicken and cook for about 5-7 minutes, stirring occasionally, until golden brown and cooked through.
-
Remove the chicken from the pan and set aside.
-
-
Cook the Vegetables:
-
In the same pan, add the remaining tablespoon of olive oil and the minced garlic.
-
Sauté for about 30 seconds until fragrant.
-
Add the broccoli and cook for 3-4 minutes, stirring occasionally.
-
Pour in the chicken broth and let it simmer for another 2 minutes until the broccoli is tender.
-
-
Add the Spinach & Combine Everything:
-
Add the fresh spinach to the pan and stir until wilted (about 1-2 minutes).
-
Return the cooked chicken to the pan and mix well, allowing the flavors to blend for another 2 minutes.
-
-
Serve & Enjoy:
-
Remove from heat and serve immediately.
-
Optionally, garnish with extra lemon juice or red pepper flakes for added flavor.
-
This Garlic Chicken with Broccoli and Spinach is a quick, healthy, and delicious meal perfect for any day! Let me know if you want any variations.
 German Chocolate Poke Cake

Why You’ll Love This Recipe
- Decadent & Rich : Layers of chocolate cake, caramel-like filling, and chocolate drizzle create a flavor explosion.
- Easy to Make : A boxed cake mix and simple ingredients make this recipe approachable for bakers of all levels.
- Perfect for Crowds : Feeds a group with minimal effort—ideal for potlucks, parties, or family gatherings.
- Customizable : Add nuts, sprinkles, or extra chocolate for your own creative flair.
- Make-Ahead Friendly : Can be prepared ahead of time for stress-free entertaining.
Ingredients You’ll Need
For the Cake:
- 1 box chocolate cake mix (plus ingredients listed on the box, like eggs, oil, and water)
- 1 can (14 oz) sweetened condensed milk
- 1 jar (7 oz) caramel sauce (optional, for extra richness)
For the Coconut-Pecan Frosting:
- 1 cup evaporated milk
- 1 cup granulated sugar
- 3 large egg yolks
- 1/2 cup unsalted butter , cubed
- 1 tsp vanilla extract
- 1 1/3 cups sweetened shredded coconut
- 1 cup chopped pecans
For the Chocolate Drizzle:
- 1/2 cup semi-sweet chocolate chips
- 2 tbsp heavy cream
Step-by-Step Instructions
Step 1: Bake the Cake
- Preheat your oven according to the cake mix instructions. Grease a 9×13-inch baking pan.
- Prepare the cake batter as directed on the box and pour it into the prepared pan.
- Bake until a toothpick inserted into the center comes out clean (about 25–30 minutes). Let the cake cool for 10–15 minutes.
Step 2: Poke the Cake
- Use the handle of a wooden spoon or a straw to poke holes evenly across the warm cake, about 1 inch apart.
- Slowly pour the sweetened condensed milk over the cake, ensuring it seeps into the holes. If desired, drizzle caramel sauce over the top for extra flavor.
Step 3: Make the Coconut-Pecan Frosting
- In a medium saucepan, whisk together the evaporated milk, sugar, egg yolks, and butter. Cook over medium heat, stirring constantly, until the mixture thickens (about 10–12 minutes).
- Remove from heat and stir in the vanilla extract, shredded coconut, and chopped pecans. Let the frosting cool slightly before spreading it evenly over the cake.
Step 4: Add the Chocolate Drizzle
- In a microwave-safe bowl, melt the chocolate chips and heavy cream together in 30-second intervals, stirring until smooth.
- Drizzle the melted chocolate over the frosted cake using a spoon or piping bag.
Step 5: Chill & Serve
- Refrigerate the cake for at least 1–2 hours to allow the flavors to meld and the frosting to set.
- Slice and serve chilled or at room temperature. Garnish with additional shredded coconut or pecans if desired.
Why This Recipe Works
- Poke Cake Magic : The holes allow the sweetened condensed milk to soak into the cake, creating a moist and flavorful base.
- Coconut-Pecan Frosting : A classic German chocolate flavor combination that adds texture and sweetness.
- Chocolate Drizzle : Adds a finishing touch of indulgence and ties the dessert together.
Variations to Try
- Add Espresso Powder : Stir 1 tsp of espresso powder into the cake batter for a deeper chocolate flavor.
- Gluten-Free Option : Use a gluten-free chocolate cake mix and ensure your other ingredients are certified GF.
- Dairy-Free Version : Substitute butter with coconut oil and use dairy-free chocolate chips.
- Nut-Free Option : Omit the pecans or replace them with toasted oats or seeds.
- Extra Layers : Spread a thin layer of whipped cream or cream cheese frosting under the coconut-pecan layer for added richness.
Tips for Success
- Don’t Skip Cooling : Let the cake cool slightly before poking and adding toppings to prevent crumbling.
- Spread Evenly : Use an offset spatula to spread the coconut-pecan frosting evenly for a polished look.
- Storage : Store leftovers in an airtight container in the fridge for up to 3 days. Bring to room temperature before serving.
Serving Suggestions
- Romantic Touch : Garnish with edible flowers or a dusting of powdered sugar for elegance.
- Brunch Staple : Serve alongside coffee, tea, or sparkling water for a light breakfast treat.
- Party Platter : Pair with fresh fruit, whipped cream, or ice cream for variety.
Final Thoughts
This German Chocolate Poke Cake is a celebration of flavors and textures, offering the perfect balance of rich chocolate, creamy coconut, and crunchy pecans. With its moist crumb, gooey filling, and customizable toppings, it’s a recipe that feels indulgent yet approachable. Whether you’re serving it for a special occasion, a casual dessert, or simply indulging in a sweet treat, this cake is sure to bring smiles and satisfaction.
Your turn! Have you ever made a poke cake before? Share your favorite variations or serving ideas below.
Macaroni Salad – Don’t LOSE this Recipe 

Why You’ll Love This Recipe
- Creamy & Tangy Dressing : A blend of mayo, mustard, and vinegar creates a rich yet refreshing flavor.
- Crunchy Texture : Celery, onions, and pickles add a delightful crunch to every bite.
- Customizable : Add hard-boiled eggs, cheese, or protein to make it your own.
- Make-Ahead Friendly : Tastes even better the next day as the flavors meld together.
- Perfect for Any Occasion : Great for summer gatherings, holiday meals, or everyday dinners.
Ingredients You’ll Need
Serves 6–8
For the Salad:
- 8 oz elbow macaroni (or any small pasta shape)
- 1 cup mayonnaise
- 2 tbsp yellow mustard
- 1 tbsp white vinegar (or apple cider vinegar for extra tang)
- 1 tbsp sugar (optional, for a touch of sweetness)
- 1/2 tsp salt
- 1/4 tsp black pepper
- 1 cup diced celery
- 1/2 cup finely chopped red onion
- 1/2 cup diced dill pickles (or sweet relish for a sweeter twist)
- Optional Add-Ins : Hard-boiled eggs, shredded cheddar cheese, diced bell peppers, or cooked bacon.
Step-by-Step Instructions
Step 1: Cook the Pasta
- Bring a large pot of salted water to a boil. Cook the macaroni according to package instructions until al dente. Drain and rinse under cold water to stop the cooking process and cool the pasta. Drain well and set aside.
Step 2: Make the Dressing
- In a large mixing bowl, whisk together the mayonnaise, mustard, vinegar, sugar (if using), salt, and pepper until smooth.
Step 3: Combine Everything
- Add the cooled macaroni, diced celery, red onion, and pickles to the bowl with the dressing. Stir gently until everything is evenly coated.
Step 4: Chill
- Cover the salad and refrigerate for at least 1–2 hours (or overnight) to allow the flavors to meld. Stir gently before serving.
Step 5: Serve
- Taste and adjust seasoning if needed (add more salt, pepper, or vinegar to suit your taste). Garnish with fresh herbs like parsley or dill if desired.
Why This Recipe Works
- Cool & Creamy Base : The mayonnaise and mustard create a velvety dressing that clings to every piece of pasta.
- Tangy Twist : Vinegar and pickles add brightness, preventing the salad from feeling too heavy.
- Texture Contrast : Crunchy veggies balance the soft pasta for a satisfying bite.
Variations to Try
- Add Protein : Stir in diced ham, shredded chicken, or hard-boiled eggs for a heartier dish.
- Cheesy Delight : Mix in shredded cheddar or Parmesan cheese for extra richness.
- Spice It Up : Add a dash of hot sauce or cayenne pepper for a kick.
- Gluten-Free Option : Use gluten-free pasta to make it safe for everyone.
- Veggie-Packed : Add diced carrots, peas, or bell peppers for extra color and nutrition.
Tips for Success
- Don’t Overcook the Pasta : Cook it al dente—it will soften slightly when mixed with the dressing.
- Chill Thoroughly : Letting the salad rest in the fridge allows the flavors to develop fully.
- Storage : Store leftovers in an airtight container in the fridge for up to 3 days. Stir gently before serving.
Serving Suggestions
- Romantic Touch : Plate individual servings with a sprinkle of paprika or fresh herbs for elegance.
- Brunch Staple : Serve alongside fried chicken, sandwiches, or quiche for a light meal.
- Party Platter : Pair with grilled meats, potato salad, or coleslaw for a full spread.
Final Thoughts
This Macaroni Salad is a classic dish that never goes out of style. With its creamy dressing, crunchy veggies, and customizable options, it’s a recipe that feels nostalgic yet versatile. Whether you’re serving it at a summer picnic, holiday gathering, or simply craving something comforting, this salad is sure to bring smiles and satisfaction.
Your turn! Have you ever made macaroni salad before? Share your favorite variations or serving ideas below.
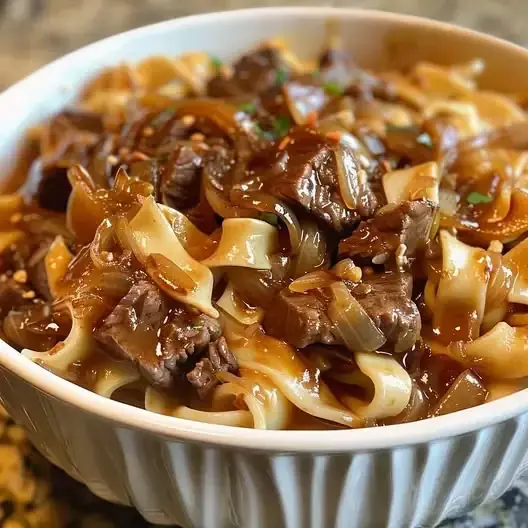
French Onion Beef and Noodles

Why You’ll Love This Recipe
- Caramelized Onion Magic : Slow-cooked onions add natural sweetness and depth of flavor.
- Tender Beef : Braised beef becomes fork-tender, soaking up all the savory juices.
- All-in-One Dish : Combines protein, carbs, and veggies in a single pot for minimal cleanup.
- Versatile : Serve as a main course or alongside crusty bread and salad for a complete meal.
- Comfort Food Vibes : Perfect for chilly nights or when you’re craving something warm and indulgent.
Ingredients You’ll Need
Serves 4–6
For the Dish:
- 1 lb beef stew meat (or thinly sliced beef strips), patted dry
- Salt and pepper , to taste
- 2 tbsp olive oil
- 3 large yellow onions , thinly sliced
- 3 garlic cloves , minced
- 1 cup beef broth
- 1/2 cup red wine (optional, but adds richness)
- 1 tsp Worcestershire sauce
- 1 tsp dried thyme (or 1 tbsp fresh thyme)
- 8 oz egg noodles (or pasta of choice)
- 1/2 cup sour cream (optional, for creaminess)
- Fresh parsley , chopped (for garnish)
Step-by-Step Instructions
Step 1: Sear the Beef
- Season the beef generously with salt and pepper.
- Heat 1 tablespoon of olive oil in a large skillet or Dutch oven over medium-high heat. Add the beef in a single layer and sear for 2–3 minutes per side , until browned. Remove the beef and set aside.
Step 2: Caramelize the Onions
- In the same skillet, add the remaining 1 tablespoon of olive oil. Reduce the heat to medium and add the sliced onions. Cook, stirring occasionally, for 15–20 minutes , until the onions are deeply golden brown and caramelized.
- Stir in the minced garlic and cook for 1 minute until fragrant.
Step 3: Build the Sauce
- Pour in the beef broth, red wine (if using), Worcestershire sauce, and thyme. Scrape up any browned bits from the bottom of the pan to incorporate into the sauce.
- Return the seared beef to the skillet, along with any accumulated juices. Stir to combine.
- Cover and simmer for 20–25 minutes , or until the beef is tender and the flavors have melded.
Step 4: Cook the Noodles
- Stir in the egg noodles and cook for 8–10 minutes , or until tender and cooked through. If the sauce thickens too much, add a splash of water or additional broth to loosen it.
- For extra creaminess, stir in the sour cream just before serving.
Step 5: Serve
- Garnish with freshly chopped parsley for brightness.
- Serve hot, with crusty bread or a side salad if desired.
Why This Recipe Works
- Caramelized Onions : Their natural sweetness balances the savory beef and broth, creating layers of flavor.
- Braised Beef : Slowly cooking the beef in the flavorful liquid ensures tenderness and juiciness.
- Egg Noodles : They soak up the rich sauce, making every bite incredibly satisfying.
Variations to Try
- Add Veggies : Stir in mushrooms, spinach, or peas for extra nutrition and texture.
- Gluten-Free Option : Use gluten-free noodles or serve the dish over mashed potatoes or cauliflower rice.
- Cheesy Twist : Top with shredded Gruyère or mozzarella cheese and broil for 2–3 minutes for a melty finish.
- Spice It Up : Add a pinch of red pepper flakes or smoked paprika for a kick.
- Instant Pot Version : Brown the beef and onions, then pressure cook for 15 minutes with the broth and seasonings before adding the noodles.
Tips for Success
- Pat the Beef Dry : Removing excess moisture ensures a good sear and prevents steaming.
- Low and Slow for Onions : Take your time caramelizing the onions—they’re the star of the dish!
- Storage : Store leftovers in an airtight container in the fridge for up to 3 days. Reheat gently on the stovetop or in the microwave.
Serving Suggestions
- Romantic Touch : Serve in shallow bowls with a sprinkle of fresh parsley and grated Parmesan for elegance.
- Brunch Staple : Pair with a glass of red wine or sparkling water for a cozy dinner experience.
- Party Platter : Double the recipe and serve family-style with garlic bread and a charcuterie board for variety.
Final Thoughts
This French Onion Beef and Noodles is a comforting, restaurant-quality dish that’s surprisingly easy to make at home. With its rich, savory flavors, tender beef, and perfectly cooked noodles, it’s a recipe that feels indulgent yet approachable. Whether you’re serving it for a weeknight dinner, a holiday gathering, or simply indulging in a cozy meal, this dish is sure to delight.
Your turn! Have you ever made a French onion-inspired dish before? Share your favorite variations or serving ideas below.


